The eighteen months of our Land Rover restoration project brought us into contact with many people who in their own way contributed to the successful outcome. We met mechanics and electricians, welders and painters, upholsterers and air conditioning specialists. After returning from our trip one of our last Saturday afternoons in Ghana before departing for Canada was spent saying thanks to many of those individuals by inviting them to Opere’s shop for pizza and beer. We set up the Defender in full campsite mode, filled the fridge with beer and soft drinks and brought some pizza from Frankies and meat pies we bought from Rejoice at the High Commission.
The turn out was not bad, if devoid of female presence. Despite that, on request we put an Ebo Taylor CD in the stereo and the boys even danced.
It was our way of saying thank you and farewell to some people who helped realize a project that was, when you think about it, rather unlikely and against the odds.
Almost two years ago when this blog was started just before we purchased the beat-up 15+ year old Land Rover Defender for restoration we contemplated some of the possible options for disposal at the end (See Posts in Planning Category). Since that time the list of possible options has grown and evolved from selling in Ghana, selling in Morocco, or shipping to Canada, and include shipping to South Africa to explore southern and eastern Africa, or retaining in Ghana, perhaps on a shared ownership basis, for future use in the region. At the time we wound up our trip all of those options save the Morocco one were still on the table. I had obtained quotes for shipping to South Africa and expressions of interest to purchase from within Ghana, We had weighed all these for some time and each had its merits, and its downsides. If we sent it to South Africa it would open up whole new horizons in southern and eastern Africa, but would carry a large financial cost associated with shipping and storage. Selling it or retaining it in Ghana would provide an incentive to return to try to get to Mali and other West African locations like Cote d’Ivoire, Senegal, etc.
So how do we get everything in the Land Rover? Laura chimes in with her comments on “overlanding”. It’s one thing to do the touristy stuff but we are living out of our Land Rover. How do we do it?
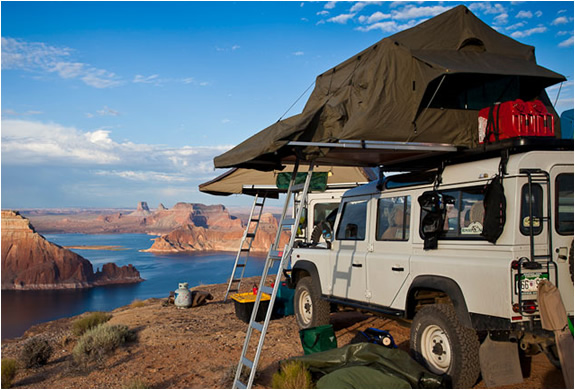
The equipment and supplies in the back of the Land Rover have been moved around a couple of times over the week and a half we have been on the road and now we seem to have things where we need them. The back of the Land Rover has been specially outfitted with 4 bins on slide out drawer rails that fit between the wheel wells. I have marked each bin lid so we know which is which. 1) Dishes 2) Pots and cooking utensils 3)Breakfast and some snacks and 4)Toiletries including malaria test kits, various antibiotics we hope not to need and the malarone tablets we are taking every day to protect against malaria. Set on top of the drawer system and the wheel wells is a plywood floor that has been carpeted. Here is where we each have our suitcase and to one side of the suitcases are the folding chairs and to the other is the plastic dish washing bin with the dish soap, sponge, tea towels and table cloth. This is also where the flashlights and fire extinguisher are kept. Then there is a box with overflow food, clothes hangers if we ever want to hang clothes to dry. (So far we have sent our washing out while in Lome. Besides which we haven’t been in one place long enough to wash and dry clothes.) and there is a basket with “activity” stuff which includes our crossword puzzles, a quilt I am beginning to piece, pens to give away when we feel charitable and a couple of books. I have my Kobo though one of the books I bought doesn’t seem to have loaded. Jonathon has tool box and a ratchet set in the middle of the floor. These have already proved useful for tightening the light on the back of the vehicle or replacing a grommet in the awning and for loan to a Togolais to repair a wheel hub on his moto.
The guide books are kept in a basket squeezed between the back of the passenger seat and the fridge is in easy reach while traveling. There is a space under the fridge floor that runs halfway across the vehicle that is handy to store things: a small shovel, the emergency road alert triangle, the jack, and the long rod that makes the fourth side of the awning. We kept the single passenger seat on the other side behind the driver and when not in use for guides or other passengers it comes in handy to put day packs and other miscellaneous pieces. The awning and its poles are inside the door on the side where the awning hangs. The fridge behind the passenger seat is plugged into a specially installed plug that runs to the second battery, which is installed under the passenger seat. The fridge is big enough to hold what we need to keep cool, from milk and butter to white wine and insulin.
On the roof beside the tent are two more almost empty black bins (“ammo boxes”) in a waterproof traveling case. These are for the purchases we make along the road. So far they just have two jars of jam and a bag of coffee from the Benedictine Monastery. Surely there will be more to come.
It took us a couple of days to master opening the tent on the roof and putting in the metal stays that hold out the fly. I try to keep the sand out of the tent by sweeping the sheets and floor every morning. We have a mini broom and dust pan that fit in a side pocket of the tent. We hang a bag from the tent frame with our pj’s that can stay there when the tent is folded. The roof of the tent is high enough to be able to sit and read by fluorescent lantern.
Jonathon on the laptop. Note the Ipod and battery monitor on the near side of the dash console
The ipods have music. The mobile speakers have new batteries. This computer can be charged using any one of the three “cigarette” lighter plugs we have wired to run off the second battery.
We have drinking water in a jerry can attached to the outside on one side, wash water in a jerry can on the other, and a propane cooking fuel canister on the back. Many people, including me, wondered about toilets. So far we have always had access to a toilet and often shower in a nearby hotel, monastery or host’s house. I do take advantage of our couple of hotel stays to wash my hair and luxuriate in a long hot shower.
We aren’t deprived – did I mention the couple of bottles of wine we have drank and replenished? As for security, all our cash, passports and other valuables are locked in a very secure hidden place that no-one will ever find, but of course I can’t tell you where it is. It’s camping comfortable. Sort of like shabby chic but with al fresco dining.
We had purchased a National Luna 52 litre “Weekender” fridge the first time we visited South Africa, which has now been gracing the storage room in our house for over a year. We had bought a Sony radio/CD/Ipod player from a duty-free importer a few months ago, and on our recent trip to South Africa obtained a couple more electrical toys, like an external light for remote campsite use at night. To run these things we decided to install an dual batter system and had bought deep cell battery in South Africa, all of these things arrived with our recent shipment. Time to get to work.
Through Francis I was able to make contact with a competent auto electrician at the local Tata/Land Rover dealership who was familiar with dual battery systems. No co-incidence that the foreman in the shop is Francis’ brother King. King and Emmanuel came by one Saturday to look at what I wanted done. There are lots of electrical projects, including the solar panel and the AC plug in, but the priority is getting the second battery running so I got them to focus on that. They established that the second battery was not going to fit into the main battery box located under the driver’s seat, and it was too high to fit into the box under the passenger seat. They left me with fundamental non-electrical challenge: Where was I going to put the second battery? They suggested that either box could be enlarged, but they were not in that business.
I did some web research and found a couple of Landy forums with discussions of second battery locations. These included getting both batteries into the main box under the driver’s seat, but batteries come in different sizes and it was clear the deep cell we bought in South Africa for our second battery was larger than most. There was also a good site with pictures of a battery box expansion and so I took my problem and these pictures to Paani my welder that has done just about every imaginable project for Defenders. In one afternoon he had expanded the box under the passenger seat to take the deep cell battery using galvanized aluminum and and made a hole in the side to run the cables.
First problem solved. Emmanuel came back last weekend with a list of the pieces he would need and a quote on the labour. After some negotiation with King, who was making him available, we agreed on a price. We also had to negotiate a day, and there was one false start because they were not ready to do it when they said they could, which meant I had to do some quick re-shuffling of projects with the welder (for the final awning work) and with Agoma the carpet person (to do the carpet for the new plywood floor in the cargo bay above the drawer system). They finally got around to it and the fridge is now plugged in and operational. There was problem with the “accessory plugs”, the two dash mounted cigarette lighter mounts that we need to power computers, phones, cameras etc. They only worked when the car was turned off, but they agreed to come by and fixed the problem quickly.
In anticipation of hot sun and abundant rain Laura and I have decided some sort of awning to offer protection from sun and rain would be really nice. The Landy we rented in South Africa (see separate January 2011 post “Testing the Idea in South Africa”) did not have one and when it rained we were limited to sitting and eating in the small area covered by the fold-out roof-top tent that came a few feet off the side of the roof, if the tent was open. Better to have something that runs the length of the side, perhaps in combination with the tent.
Like all our outfitting needs, the challenge in Ghana is where do we get it from? There is no shortage of manufactured RV/4×4 awnings in the market, but not in the market in Ghana. We knew we were taking a shopping trip to South Africa to buy outfitting gear (see separate March 2012 post “A Shopping Spree Like no Other” www.overlandrover-westafrica.net/?m=201203) and there are a great number of manufactured options available, including a couple from Eezi-Awn, the South African manufacturer that makes the rooftop tent that we are buying. The problem with these is that outfitters tend to be bulky and heavy, do we really want another 20 kilos hanging off one side of the roof? We also need to make choices to keep shipping, and purchase, costs down. The manufactured awnings are all rather expensive, seem to start about CAD 500 and go up from there.
I have a better idea. Instead of going for one of the manufactured awnings I have designed one to fit our roof rack and am getting Paani the welder, who has now done more work on the Landy than any other single person with the possible exception of Opere the mechanic, to put it together. It was Paani who rebuilt the doors and the original body work and a number of things around the body.
My awning design is based on the existing roof rack, which is built of metal 1″ square. The carrier rests on 12 of these 1″ square vertical “posts” that sit in the gutter that runs long the side of the roof above the windows. I encouraged Paani to use the same 1″ square metal to design and build two flat right-angle triangles 6″ high x 5′ long. The catalogue of Lee Valley Tools in Ottawa Canada was the source for quality stainless steel 1″ piano hinge used to fasten these two triangles to two of the upright posts in the roof rack, 6′ apart. The triangles swing out from the carrier to right angles with the Landy and are held apart with a 6′ long bar, also created by Paani, mounted on the ends to form a square. A piece of canvas fitted with grommets then stretches over nipples on the top of the frame to make a tight, sloping 5’x6′ awning. To collapse it, the canvas comes off and goes in a bag and the triangle supports fold in flat against the roof rack. The end bar slips into long space beside the drawers on the cargo bay floor and the bag with the canvas gets thrown anywhere in the back. That is the basic design, there are a couple of subtle refinements that make it work. There is a 1″ thick piece added to one of the uprights so that the triangles fastened to it can hinge so it folds flat over the other triangle to close. A piece of velcro wraps around the triangles to keeps them tight against the side of the roof rack. If I may say so myself, it is a brilliant design, unfortunately there is not enough market to make it worth going into production.
6″ high triangle designed by Paani provide all the support requiredPaani with his finished product, complete with canvas bought in SA and tailored by Laura. The canvas comes down over the triangle but is folded up here to illustrate the structure.
The final cost turned out to be less than CAD 350, including Paani’s great work ($200), material for metal triangles and fittings($70), the canvas and tailor ($60), the grommets ($10) even the hinges ($10). This compares very well to the cost of any of the manufactured options. The small Eezi-Awn option lists on-line at $700, which of course does include the shipping to get it to Ghana. Another important point of comparison is the weight. The advertised weight of the small Eezi-Awn awning is 30 lbs (14 kgs), all the pieces of ours add up to 19 lbs (9kg). And best of all, and perhaps somewhat surprisingly, it works very well. Using the grommets it fits snugly over the frame and there is no perceptible sag. It takes longer to set up and take down than a retractable awning but it is still pretty easy, and there are no moving parts to fail.
There were 4′ of the Lee Valley piano hinges left from the 6′ piece I bought, I left this with Paani so he can build, and sell, a couple more in response to the interest expressed by other Landy owners who have seen ours when they are visiting the shop.
After more than two months the outfitting hardware we had shipped from South Africa in March finally arrived in Accra in June. There were two risks that could have prevented us from getting out on the road for our planned mid-June departure. One was getting ownership and registration transferred legally; the other was getting the outfitting gear in time to install it. Both happened the same week, and both took much longer than they should have. The shipment is here only two weeks before our planned departure.
The glass is half full and it is possible to see this dream coming true. We now have a good set of Defender overland gear: a rooftop tent, a cargo bay storage system, jerry cans with mounting brackets, running and working lights, a solar power system, a deep cell accessory battery, a security box and various other miscellaneous items. The problem is the timing. We have one week to install all this stuff, and that is not going to be easy.
Francis and I raise a glass of Pro Seco to celebrate the arrival of the shipmentExamining the jerry can mounts with blue jerry cans and partially erected tent in foreground
The “dashboard ” of older Defenders between the drivers panel and the passenger door is notable for its very basic design. It is very much function over form, and the function is pretty basic. There is no “glove-box”, just a 4′ wide, open area with a 2″ high lip along the bottom edge to keep anything from falling out onto the floor. There are two large “ventilator control” levers used to raise the two 2′ x 4″ metal covers than run outside between the windshield and bonnet. There is a a simple switch panel in the lower central section of the dash that almost seems like an afterthought to hold the cigarette lighter and the switch for the rear windshield washer. As to where one puts a radio I was left guessing. Our vehicle must have had a radio and other electrical accoutrements at some point, the motley collection of wires that protrude from a hold in the bottom of the dash attest to that. Some of these wires go to speakers to the sides of the roof panel above the front seats, others go to the an elaborate electrical box mounted in the rear fender to house an external AC plug-in and outlets for accessories. The speakers were still installed, but were very worn out and we removed and discarded them when we redid the roof panel. All the wires are still in place.
Original dash, with basic oval panel for rear wiper switch and accessory plug visible. Note ventilator levers and vents under the upper dash
Our ideas for upgrading the dash range from creating and installing attractive hardwood “glove-box” doors that would hinge from the flat bottom lip of the dash to close under the top dash. This would add some visual ascetic appeal as it would conceal the open area. The downside is that these cover the vents that are designed to allow air to flow in (or, as James May of Top Gear jibed “just in case it isn’t noisy enough inside already”), but this is not such a concern when we have air conditioning. I have even purchased some mail-order hinges from a cabinetry shop in Canada (Lee Valley) that may work for the this, finding the hardwood here that is thin enough is proving to be more of a challenge.
However none of this addresses the problem of how to mount a radio. This vehicle must have had a radio, the wires are still there, as are two now-defunct 6 1/2 inch speakers mounted in the ceiling panels above the front doors on either side, but there is no evidence of where the radio might have been mounted. There are no holes that suggest there might have been a radio housing screwed in somewhere. However, none of this addresses the problem of how to mount a radio/CD player. No holes remain visible in any part of the dash that suggest screws were once mounted there.
We opted to get a console from MUDSTUFF, www.mudstuff.co.uk/index.shtml , a company in England that produces a range of aftermarket accessories designed for Land Rovers. The console is simply a plastic form that comes with a metal mounting frame and installation instructions. The user can choose whether they want to use the console to mount switches, meters, a radio, and the precise location of each. I ordered the console, a radio mount, an additional plug-in for AC power and some switches for lights and other accessories.
Installation was not terribly difficult, although it took longer than it would have if I had access to the tools I have storaed in Canada. I did bring a set of basic hand tools with me, which I have supplemented with a ratchet set that I purchased here. I am getting good use of all these, but I do not have any power tools. I had brought a set of light Black and Decker battery-operated tools, but the charger is not working here and it is only possible to get very light work done before the batteries expire. To install the console it is necessary to remove a section of the dash that requires cutting through a foot long section of metal. Getting the tool to do this proved to be the most difficult and time-consuming part of the project.
Original switch panel removed and dash marked for cut-out
I asked around to see who might have an electric hacksaw and ended up dealing with James, who is a contractor to the property management team at the High Commission where I work. James came by and quickly determined that a hacksaw was not going to do the job and we went off together last Saturday morning to a metal shop that had a “grinder”. This is a fairly heavy duty rotary tool that can be mounted with a range of different 4″ blades. It was noisy, messy job that took about 20 minutes and GHC 15 ($10), with another GHC 20 for James as fixer, a role which in addition to getting me to the grinder included some other drilling work in the console panel itself that he did with his own electric drill.
Dash cut out and console mounting frame installed. Note the A/C unit has been temporarily removed
At this point there is a bit of a sick feeling because all you have is a big gash in the dash and the panel that held the lighter and rear windshield washer switch is gone. From there is was more satisfying. The metal mounting plates for the console screwed into the area between the vent levers without difficulty. The vehicle has a plastic trim piece that runs along the top of the bottom front lip of the dash catch area that has to be cut. I had to stop in the middle of the installation to go up to Opere’s to borrow a simple hacksaw blade to cut the trim because I don’t have one of those either. It took five minutes to do the cutting but almost an hour to get there and back. I really miss my tools.
The biggest challenge was adapting the console and the air conditioning unit. Distribution of A/C in a Defender, at least in ours, consists of a 2-3″ high channel that screws snugly along the flat bottom of the dash. The MUDSTUFF console has a wide plastic flange e that is designed to slip between the A/C unit and the dash, which helps to establish a firm footing for the console. Unfortunately, I had recently had my A/C unit remounted complete with a screw right in the area where the flange has to go, which prevented the console base piece from slipping in. The amount of time I had to spend unmounting and remounting the A/C unit before I realized all I really had to do was cut the flange was incredible.
Console front with cut-out marks for switches and radio; original wiper switch and 12V accessory have been installed.
Cutting the holes in the console required some precision, and again the lack of tools was a pain. I could mark out the places for the radio, the switch plates, and the AC power converters (cigarette lighters), but cutting them out was more difficult. I was able to coax enough power from my B&D battery operated drill to cut round holes in the corners of the square holes for the radio and switch plates, but had to get James cut the lines to complete the job. With that I was able to mount everything into the console and install it. It is only a temporary placement of course , we don’t have speakers yet for the radio, or light to hook onto the switches yet, but the unit can be easily removed with three screws to get at the backs of the switches and the radio casing to complete the hook-ups.
Finished Product Installed with Radio and Switches
We still have to run the wires to the unit for radio and switches, but I am waiting for the lights from SA Africa (separate post coming on “a shopping trip like no other”) and we are still in the market for speakers, that one is getting to the top of the priority list .
Other project ideas for the interior front include the replacement of the vinyl-trimmed top of the cubby box between the front seats with a more attractive hardwood panel, and doors fro the dash from the same material. Then there are a whole list of things to do to make the cargo bay expedition ready. One of my biggest problems now is limited time. There is only so much you can do on weekends, I need to stop working long hours in the office, and using my vast stores of accumulated leave to devote to the Landy project.
Finished console with radio and switches for front running and rear area lights. Set up to accommodate two additional switches if required.
Now that the restoration stage is pretty much complete we have to get serious about adding the things that will make our Defender usable for overland travel. This involves planning for and procuring a whole range of systems (see separate Feb. 2012 post “Planning the Outfitting Stage”) Unfortunately, there is really nothing at all one can get in Ghana for this, nor do any of our internet suppliers include much expedition gear in their offerings. We decided that the best way to deal with this is to go ourselves to South Africa to buy stuff Our trip to South Africa included the My Land Rover has a Soul Festival (see separate post “Woodstock for Landy Lovers”) and a side trip to Victoria Falls, as well as a few days exploring the amazing Blyde River Canyon in northeastern South Africa. But the real purpose was shopping.
South Africa is arguably the best source for expedition outfitting gear in the world. There are many manufacturers and many more distributors. We had seen some of this during our first visit to South Africa in 2010 (see Jan. 2011 post on Testing the Idea in South Africa) and were able to make a list of things we might want to pick up on a return visit. We made that return visit in late February equipped with a list of about twenty items we needed and another list of a half dozen stores/suppliers to look at. The latter ranged from big box camping stores like Outdoor Warehouse to excellent 4×4 outfitting specialist stores like Front Runner 4×4 or Safari Centre, as well as suppliers of specialized items like solar power systems or awning canvas suppliers. All the photos in this post are stock photos from the suppliers, our own stuff is still on a boat somewhere en route to Ghana.
Rooftop Tent: Our experience renting an outfitted Defender introduced us to the concept of a hard floor canvas tent that bolts to a rooftop carrier. (see Jan. 4, 2011 post, Testing the Idea) The roof rack that came with our Defender will accommodate this very nicely. There are a few tent products available from different places, ranging from South Africa, Italy, Australia, etc. This is the largest, (heaviest) and most costly piece we need so we invested a fair bit of time looking at the available options. After doing lots of research we settled on the Eezi-Awn Jazz tent, a first-class quality and tested product of South Africa. Weighing in at 55 kilos there is nothing like this really. Erects quickly and easily via a ladder that comes out from underneath the floor and fills our need quite nicely. This is what we had for our earlier test run in South Africa trip and we loved it. Now we own one.
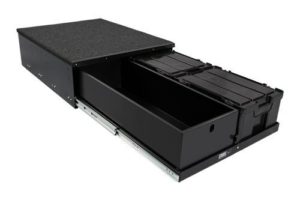
Storage Drawer System. As we learned from our earlier rental, the design of the Defender cargo bay supports the installation of a flat floor between the wheel wells in the cargo bay which creates a 1′ high x2′ wide x 4 ‘ deep space and lends itself well to installing drawers that then open out the back when the cargo bay door is open. Frontrunner 4×4 www.frontrunner.co.za in Johannesburg produces a great drawer system using simple and affordable “ammo” boxes.
In the Defender we rented from Bushlore it was this system that they used to carry all the kitchen gear and some other miscellaneous pieces. We liked it so much we went back to Frontrunner and bought one. There are other makers of 4×4 drawers but we did not see anything that was as cost-effective. I was very surprised to see a review of drawer systems carried in the Winter 2012 issue of Overland Magazine did not even seem to acknowledge the existence of this South African product. This is likely because of the American base of that magazine, but I think they missed the best product.
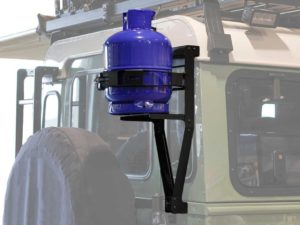
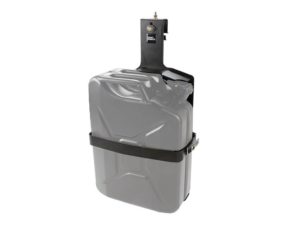
Propane and Water Storage. One can buy jerry cans in Ghana but they are very expensive and they do not come with harnesses to mount them. We looked at various floor and wheel well fuel and water storage systems that Frontrunner or others make for Defender but decided these were more that we needed or could organize for and opted instead to pick up stock water and propane tank carriers designed to fit on the side and rear exterior walls of a Land Rover Defender.
Propane Tank Rack from Front Runner
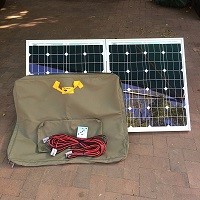
Solar Power System: After some on-line research we decided that back up power to help ease the draw on the vehicle battery when parked is a worthwhile investment. Like so much to do with overlanding there is enough demand for this in South Africa to support a couple of specialist suppliers. The one we visited was Bushpower http://www.bushpower.co.za run out of the garage of a suburban house in Kyalami on the northern reaches of Johannesburg, only about two kilometres from the Frontrunner store and factory. The panels and related wires and switches are all imported, mostly from Europe. We purchased an 85 watt panel with mounting and cables, together with a dual battery monitoring system.
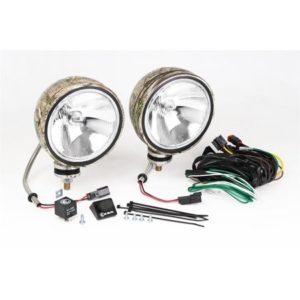
Lights: The front headlights on our Defender are not the brightest I have seen and our comfort driving at night will be greatly facilitated by additional lights. It is quite common for 4x4s to be equipped with an extra set on the bumper or roof rack. I had been looking at 70 watt Lightforce from Australia but the only place I saw them they were very expensive relative to other quality options. We opted for a product called KC, which I believe is an American company based in Arizona. These were recommended by the Safari Centre store in Centurion which carries a range of very high quality 4×4 products.
Because it gets dark at 6:00 PM here we also need to have an area light for meal prep and eating at night. We happened to notice one type in particular on the backs of three Land Rovers in parking lots our first couple of days in Jo’burg and when we saw exactly the same light in Frontrunner we figured it must be good so we picked it up.
Canvas for Awning: There are a number of roll-up awnings available in the market, including a range manufactured by Eezi-Awn tent producer. There is value in having something to provide protection from the sun and rain, but the manufactured awnings all seem expensive and require quite a bulky, heavy case that mounts permanently to the side of the vehicle. I came up with our own awning design (see separate Awning Made to Measure post for details) for which we needed some material. We thought of this when we saw a store that sells awnings for windows and decks and went in to have a look. As it turned out they did not sell material itself, but the helpful woman in the store referred us to a place called Home Hyper City near Pretoria, where she said we should see Uncle Joe. The store was the largest fabric store we have ever seen two floors the size of a football field, really incredible. We found Uncle Joe and explained what we were looking for to which he replied “oh, for your baakie?” A baakie is the term South Africans use to refer to what North-Americans know as pick-up trucks, but the term can also be used to refer to any 4×4. He led us to a row where they had a range of weights and colours of canvas and we picked up a couple of metres of canvas in two colours that will look good together and complement our own “baakie” quite nicely.
Miscellaneous: We bought a few things that were not on our list to supplement the miscellaneous items we had purchase in December 2010. A funnel, speaker wire, fastening straps, an ammo box for the roof with a water proof cover to hold sundry items like souvenirs purchased along the way, silicone spray for the awning, etc. When the shipment finally arrives in Accra we will no doubt be pleasantly surprised by things we have forgotten we purchased. It will be like Christmas, hopefully it won’t take that long to get the stuff!
By the time we were done we were glad we had bought the fridge and other outfitting gear the first time we came to South Africa from Ghana because after 3 days of nothing but shopping we had run out of time and had to go back to Ghana. The purchase of all these items came in the last few intense days of our time in Johannesburg, after our trip to Victoria Falls and the Blyde River Canyon. The most difficult part was arranging shipping. We had started the process weeks before we left Ghana through a company that brings things in to Ghana from South Africa and this led to a recommendation to rent partial space in a container to be sent by sea as an inexpensive option. It was indeed a very affordable option, unfortunately the Jo-burg forwarder we had been referred to turned out to be non-responsive and we had to go back to the original contact to try to get their attention and this led to referral to another forwarder. They turned out to be much more responsive, but it all took awhile to arrange and it not until our last couple of days in Jo-burg we had settled with them. We had to impose upon the Safari Centre 4×4 store in Centurion (between Johannesburg and Pretoria) where we bought the tent, second battery, lights and other accessories to hold all our things, not just what we bought there, but everything from all the suppliers, until the forwarder could come by to get it. They agreed to do so, and we delivered all our other sundry items to them the day before we left,on the understanding that the forwarder (Synergy) would retrieve it in the next couple of days. It actually took Synergy more than two weeks to get around to picking the stuff up, which also meant they missed the sailing of the boat they had initially said we could use. Thanks very much to the Centurion Safari Centre for helping us out in a jam.
Who ever heard of such a thing as a Land Rover Festival? But there it was, featured on the sheet on the counters or walls of the various overland outfitting shops we visited in the first couple of days in our recent trip to Johannesburg in South Africa. Apparently, part of the idea of the festival was to try to break the Guinness World Record for the greatest number of Land Rovers in a single convoy. An added incentive for us to attend there were a large number of suppliers offering on-site sales, including a “boot sale” which is the British/South African/I’m not sure where else equivalent of a flea market.
As shopping for items for the outfitting stage of our own Land Rover project was the main reason for our trip to South Africa, the opportunity to hang out with other Land Rover owners in what is arguably the world centre for Land Rover overlanding is not something easily passed up. Despite the attraction, the fact the so-called festival was taking place during the time we had booked for a 3 day trip to Victoria Falls between Zambia and Zimbabwe, one of Africa’s premiere destinations presented no small dilemma. Victoria Falls is a place that I have wanted to get to for a long time and we had decided to priorize our time for Vic Falls in what may be our last trip to South Africa before our Ghana posting ends this summer. The solution we chose to resolve the dilemma was to split the difference. Delay the trip to Victoria Falls by one day to catch the first day of the two day Landy festival (missing the Guinness record shot convoy) but still be able to spend two nights at beautiful Victoria Falls.
Our shot of Victoria Falls from the Zimbabwean side
The timing actually worked out very well. Laura decided to hold to the original schedule and go to Victoria Falls on Saturday morning and I was able to reschedule my flight by one day and take Laura to the airport in Jo’burg in our rented Volvo at 8:00 AM on my way out to Vaal, the rural district south of Jo-burg where the festival was scheduled to take place. It is worth mentioning the Volvo because it was, without any doubt, the only one present at the Land Rover Festival.
As usual, getting there was half the fun. I had obtained directions on-line how to get to the Malojeni Guest Farm, which was the site of the festival, from the Oliver Tambo Airport in Jo’burg. Unfortunately I learned too late that for some reason my Blackberry could not download the full directions file so I had instructions about two thirds of the way. I ended up in the middle of a very pleasant Vaal town called Meyerton. After unsuccessfully trying to get directions from a service station I was able to close the distance simply by following a Land Rover I saw driving by. It was while en route at this point that the Woodstock analogy first occurred to me. The line “going down to Yasgur’s farm” from the CSN song popped into my head at a small country junction where three Landys coming from three different directions converged and all headed up the same road. Clearly, I was headed in the right direction.
Registration Line at 11:00 AM on Saturday
The South African love of Land Rovers is such a phenomenon because of a couple of factors. The South African Armed Forces was/is a big user of Landy’s, and thus a source of slightly used “surplus” product for the population at large over a number of years. Another factor in all of this is the South Africans’, specifically the Afrikaaners’, love of overlanding. This is one of the features of Afrikaan’s culture that we have really come to appreciate through our visits here and the knowledge of history that comes with that. One of the defining moments of the Afrikaaner’s history was the “voortrek”, the overland journey taken by the Dutch settlers in the 1840’s to get away from the Brits that were encroaching in the more accessible areas around Cape Town where the Dutch had first settled a couple of generations earlier. The Afrikaaners are a fiercely independent people and extremely proud of their heritage. The “voortrek” became an fundamental part of Afrikaaner history and culture and by carrying through on their love of adventure and exploration of remote areas the Afrikaaners played a huge role in defining the African overland experience through pioneering trips into the some of the more remote areas of southern Africa, including Botswana, Mozambique, Namibia, Zimbabwe, Zambia and points beyond. The vehicle of choice for most of this overlanding has been the Land Rover Defender. It is really an incredible cultural phenomenon, one that has led to the proliferation of a huge number of overland outfitters and suppliers in the country, not limited to Land Rovers of course but certainly favouring them.
This title of the festival was “My Land Rover Has a Soul”, (MYLRHAS’ is the acronym). This illustrates the passion that South African Land Rover owners have for their vehicles and that passion was very evident at the festival. There were hundreds and hundreds of vehicles there on Saturday, every model ever made well represented, Series, Defenders, Discoveries and big 130s, all boasting their own particular style and personality. Some were very stock, others very customized and colourful. But it is not really so much the vehicle, the Land Rover has just perchance become a modern day expression of the Afrikaaner`s love of overland travel. Afrikaans was the first language at the MYLRHAS festival, and the festival was really less about the specifics of Land Rover mechanical or body design than it was about overland equipment outfitting: tents, awnings, cooking equipment, storage, water systems etc. all things which the very functional Land Rover design is conducive to. There was even an expedition wine carrier.
Other elements of South African/Afrikaans culture were well represented at the festival. Virtually all the food came off from the “braai”, the ubiquitous SA barbecue. Indeed the air was so thick with charcoal smoke, whether from a couple of communal braais or the many individual ones at the various campsites, that it was sometimes difficult to breath. South Africans are crazy about braais, for boerwurst sausage, or burgers or steak. They are also crazy about beer. Canadians also love their beer, but here virtually everyone was walking about visiting the shops and displays at 11:00 o’clock in the morning with a beer in their hand. This is not a culture I have any difficulty adapting to.
South Africans love their Beer and Braai
M&M’s product line includes leather “expedition wine cases” for your Pinotage
There were hundreds of vehicles and thousands of people, plenty of families with kids. In addition to the food and expositions there were helicopter rides, and an air show. No flying Land Rovers, rather some old, loud, single engine planes that were unspectacular but steady, like Land Rovers would be if they had wings. I sat down with my boerwoerst and beer lunch to listen to the live singer/guitarist musician whose repertoire included Van Morrison, Simon and Garfunkel, Sting, and, incredibly, Led Zeppelin. All good music for the white, baby-boomer audience in attendance, But after he was done with the boomer stuff the musician switched to Afrikaaner folk songs and the response was enthusiastic, to to say the least. I was treated to a real Afrikann`s culture moment, complete with beer and braai and songs about independence and overland travel. If there were any blacks there I did not see them, this seems to be exclusively a white South African, Afrikaans cultural phenomenon.
In addition to the cultural experience, I was able to benefit from the collection of overland outfitters and suppliers. In addition to a better knowledge of the market I came away with a floor-mounting safe for our vehicle, as well as a lovely Land Rover cap that I have always wanted but never came across.
I did miss the Guiness Record shot. The convoy apparently had 1007 Land Rovers of various vintages and models, ranging from Series from the 50s and 60s to just-off-the-line Discovery 5s and the new euro-styled Range Rover Evoque. The line stretched for 24 kilometres between first and last Landy. Apparently they are waiting to hear from Guiness if they have the record, but I can’t imagine anyone every getting more than 1,000 Land Rovers in a convoy before. There are some videos on youtube…….
I would have loved to have been able to stick around to overnight and to participate in the Sunday convoy, but my rented Volvo would hardly have fit in, so heading back to Jo`burg to catch the Sunday morning flight to Victoria Falls was easy to do.
This is the first post in the Expedition/Outfitting category of the West African Wander blog, one year after we first purchased the vehicle. That delayed post is terribly misleading, in fact we started thinking about outfitting very early, and even purchased a National Luna 52 litre fridge in late 2010 before we even bought the Land Rover to put it in. Since then the focus has definitely been on restoring the basic vehicle (see post on a Look Back at the Year), but we have made a number of purchases that fall into the outfitting category. This post is going to provide a brief picture of where we want to get to.
The idea for the six-week trip is to spend much of the time camping, interspersed with hotel stays. That means we need to outfit the Defender to sleep, cook, eat , wash and various other sundry activities. Laura and I very much enjoy the outdoors and have done lots (I mean lots!) of camping, including car and canoe camping in Canada and backpacking in Costa Rica. However our overland vehicle experience is limited to the week we rented an outfitted Defender from Bushlore in Johannesburg in 2010 and took it up the Sani pass into Lesotho (see separate post TESTING THE IDEA). We had also rented a small motorhome van with our daughter Katherine to do a trip through the Alberta foothills years ago on the way to our niece’s wedding in Waterton Lakes National Park. Not exactly off road or as immediately relevant to a Defender, but it still provided some exposure to independent vehicle camping.
Essentially our approach is to think in terms of systems, a preliminary list of which could include:
Electrical: We will install a dual battery system where the first battery is devoted to keeping the motor running and a second serves to power camping accessories when the motor is not running, such as a fridge, lights, sound system, computer, etc. Solar power back-up will also be useful.
Cooking/eating: In South Africa we carried two propane tanks with fitting burners. We need to find out what fuel supply is most available in the area we are covering and design a system to fit that. Cooking and eating utensils also fall into this system, as do a table and perhaps a shade/rain awning.
Sleeping: Basically, a tent to protect from the elements. We really liked the roof-top tent we used in South Africa/Lesotho and just need to figure out how to get one into Ghana.
Water: We need water for washing and potable water for drinking and cooking. Options for either include storage tanks installed in the wheel wells or the back seat interior floor or jerry cans mounted on the side or the roof. Safe weight distribution, specifically the need not to put too much weight on the roof, is one of the considerations that favours the storage tank system. Water sources will be limited and for drinking water we may need to rely on buying commercial bottles and just store those. Some way of purifying water, and cleaning fruit and vegetables, will also be necessary.
Lighting: This close to the equator it gets dark at 18:00 every night so having sufficient exterior light to be able to use and enjoy evenings is very important. I would also like to have additional driving lights as a backup in case of system failure or in the event of sandstorms. And extra driving lights on a 4×4 look so cool…..
Recovery: This is the term the 4×4 off-roaders use to refer to getting unstuck. It is probably not worth investing in a winch because we are not planning or expecting to do much off-roading, but a tow-rope, whether for our benefit or for others, is probably a good idea, as would be jumper cables. This category could also include a tire pump and sand ladders of some sort.
Maintenance: This is about the tools that are required to address the most likely problems that might arise.
Storage: All the systems mentioned above imply some need for storage, indeed water and fuel systems are essentially storage systems. However, we need to think about accessible storage for all the kitchen gear, food, clothes, tools and accessories. The refrigerator is an important component of storage.
In addition to these these “systems”, there will no doubt be other things that will come up as we learn more about “overlanding”. From now on most posts will be in the outfitting category.


")