The eighteen months of our Land Rover restoration project brought us into contact with many people who in their own way contributed to the successful outcome. We met mechanics and electricians, welders and painters, upholsterers and air conditioning specialists. After returning from our trip one of our last Saturday afternoons in Ghana before departing for Canada was spent saying thanks to many of those individuals by inviting them to Opere’s shop for pizza and beer. We set up the Defender in full campsite mode, filled the fridge with beer and soft drinks and brought some pizza from Frankies and meat pies we bought from Rejoice at the High Commission.
The turn out was not bad, if devoid of female presence. Despite that, on request we put an Ebo Taylor CD in the stereo and the boys even danced.
It was our way of saying thank you and farewell to some people who helped realize a project that was, when you think about it, rather unlikely and against the odds.
Almost two years ago when this blog was started just before we purchased the beat-up 15+ year old Land Rover Defender for restoration we contemplated some of the possible options for disposal at the end (See Posts in Planning Category). Since that time the list of possible options has grown and evolved from selling in Ghana, selling in Morocco, or shipping to Canada, and include shipping to South Africa to explore southern and eastern Africa, or retaining in Ghana, perhaps on a shared ownership basis, for future use in the region. At the time we wound up our trip all of those options save the Morocco one were still on the table. I had obtained quotes for shipping to South Africa and expressions of interest to purchase from within Ghana, We had weighed all these for some time and each had its merits, and its downsides. If we sent it to South Africa it would open up whole new horizons in southern and eastern Africa, but would carry a large financial cost associated with shipping and storage. Selling it or retaining it in Ghana would provide an incentive to return to try to get to Mali and other West African locations like Cote d’Ivoire, Senegal, etc.
With the receipt of our shipment from South Africa last week there is suddenly a lot to do. Among the things we have is an ammo box drawer system from Frontrunner Outfitters designed to fit between the wheel wells of a Defender.
We had long planned to install this, but dithered about what material to use for the “floor” that it allows one to create across/between the wheel wells. We decided this week to go back to the lumber yard at Newtown for some 1/2″ plywood that we had at first thought was too expensive at GHC 110 ($65). The largest gap is only two feet and there is little weight that will go on this so 1/2″ thick is plenty. It may be we were looking at 5/8″ before, or maybe we just negotiated better this time, but we got a 4×8 sheet for the “real” price of $40. I took a sheet and a half so we have enough to put short but usable sides in between the wheel well and the window that we can bolt things to, like the fire extinguisher. I took all these pieces to Agoma, the fellow who had carpeted the front front and redid the ceiling and had him cover the plywood in the same carpet as the rest of the vehicle. It looks very finished, this really seems to impress the Ghanaians who see the vehicle. We also had enough plywood to create a raised floor behind the front passenger seat to hold the refrigerator.
The Front Runner drawer system gets bolted to the floor below and the floor above, which in turn is bolted to the wheel wells, so it is all very solid. There is abolutely no rattle. The Frontrunner design ensures the sliders sit solid and I added more soundproofing onto the wheel wells before putting in the upper “floor” across and along the top of the wheel wells. This is a somewhat improbable feature of my design – the cardboard I used to raise the `floor` between the wheel wells above the Front Runner drawer storage system. The cardboard actually comes from a pallet` that was used by the freight forwarder to load our our shipment of overland gear from South Africa. If the 2″ thick cardboard that the shipping pallet was constructed from was strong enough for that then they should be able to handle supporting our upper floor, and they add virtually nother to our running weight. With these as a cushion between the plywood upper floor bolted to the top of the wheel wells it is quiet – at least for a Land Rover.
Who ever heard of such a thing as a Land Rover Festival? But there it was, featured on the sheet on the counters or walls of the various overland outfitting shops we visited in the first couple of days in our recent trip to Johannesburg in South Africa. Apparently, part of the idea of the festival was to try to break the Guinness World Record for the greatest number of Land Rovers in a single convoy. An added incentive for us to attend there were a large number of suppliers offering on-site sales, including a “boot sale” which is the British/South African/I’m not sure where else equivalent of a flea market.
As shopping for items for the outfitting stage of our own Land Rover project was the main reason for our trip to South Africa, the opportunity to hang out with other Land Rover owners in what is arguably the world centre for Land Rover overlanding is not something easily passed up. Despite the attraction, the fact the so-called festival was taking place during the time we had booked for a 3 day trip to Victoria Falls between Zambia and Zimbabwe, one of Africa’s premiere destinations presented no small dilemma. Victoria Falls is a place that I have wanted to get to for a long time and we had decided to priorize our time for Vic Falls in what may be our last trip to South Africa before our Ghana posting ends this summer. The solution we chose to resolve the dilemma was to split the difference. Delay the trip to Victoria Falls by one day to catch the first day of the two day Landy festival (missing the Guinness record shot convoy) but still be able to spend two nights at beautiful Victoria Falls.
Our shot of Victoria Falls from the Zimbabwean side
The timing actually worked out very well. Laura decided to hold to the original schedule and go to Victoria Falls on Saturday morning and I was able to reschedule my flight by one day and take Laura to the airport in Jo’burg in our rented Volvo at 8:00 AM on my way out to Vaal, the rural district south of Jo-burg where the festival was scheduled to take place. It is worth mentioning the Volvo because it was, without any doubt, the only one present at the Land Rover Festival.
As usual, getting there was half the fun. I had obtained directions on-line how to get to the Malojeni Guest Farm, which was the site of the festival, from the Oliver Tambo Airport in Jo’burg. Unfortunately I learned too late that for some reason my Blackberry could not download the full directions file so I had instructions about two thirds of the way. I ended up in the middle of a very pleasant Vaal town called Meyerton. After unsuccessfully trying to get directions from a service station I was able to close the distance simply by following a Land Rover I saw driving by. It was while en route at this point that the Woodstock analogy first occurred to me. The line “going down to Yasgur’s farm” from the CSN song popped into my head at a small country junction where three Landys coming from three different directions converged and all headed up the same road. Clearly, I was headed in the right direction.
Registration Line at 11:00 AM on Saturday
The South African love of Land Rovers is such a phenomenon because of a couple of factors. The South African Armed Forces was/is a big user of Landy’s, and thus a source of slightly used “surplus” product for the population at large over a number of years. Another factor in all of this is the South Africans’, specifically the Afrikaaners’, love of overlanding. This is one of the features of Afrikaan’s culture that we have really come to appreciate through our visits here and the knowledge of history that comes with that. One of the defining moments of the Afrikaaner’s history was the “voortrek”, the overland journey taken by the Dutch settlers in the 1840’s to get away from the Brits that were encroaching in the more accessible areas around Cape Town where the Dutch had first settled a couple of generations earlier. The Afrikaaners are a fiercely independent people and extremely proud of their heritage. The “voortrek” became an fundamental part of Afrikaaner history and culture and by carrying through on their love of adventure and exploration of remote areas the Afrikaaners played a huge role in defining the African overland experience through pioneering trips into the some of the more remote areas of southern Africa, including Botswana, Mozambique, Namibia, Zimbabwe, Zambia and points beyond. The vehicle of choice for most of this overlanding has been the Land Rover Defender. It is really an incredible cultural phenomenon, one that has led to the proliferation of a huge number of overland outfitters and suppliers in the country, not limited to Land Rovers of course but certainly favouring them.
This title of the festival was “My Land Rover Has a Soul”, (MYLRHAS’ is the acronym). This illustrates the passion that South African Land Rover owners have for their vehicles and that passion was very evident at the festival. There were hundreds and hundreds of vehicles there on Saturday, every model ever made well represented, Series, Defenders, Discoveries and big 130s, all boasting their own particular style and personality. Some were very stock, others very customized and colourful. But it is not really so much the vehicle, the Land Rover has just perchance become a modern day expression of the Afrikaaner`s love of overland travel. Afrikaans was the first language at the MYLRHAS festival, and the festival was really less about the specifics of Land Rover mechanical or body design than it was about overland equipment outfitting: tents, awnings, cooking equipment, storage, water systems etc. all things which the very functional Land Rover design is conducive to. There was even an expedition wine carrier.
Other elements of South African/Afrikaans culture were well represented at the festival. Virtually all the food came off from the “braai”, the ubiquitous SA barbecue. Indeed the air was so thick with charcoal smoke, whether from a couple of communal braais or the many individual ones at the various campsites, that it was sometimes difficult to breath. South Africans are crazy about braais, for boerwurst sausage, or burgers or steak. They are also crazy about beer. Canadians also love their beer, but here virtually everyone was walking about visiting the shops and displays at 11:00 o’clock in the morning with a beer in their hand. This is not a culture I have any difficulty adapting to.
South Africans love their Beer and Braai
M&M’s product line includes leather “expedition wine cases” for your Pinotage
There were hundreds of vehicles and thousands of people, plenty of families with kids. In addition to the food and expositions there were helicopter rides, and an air show. No flying Land Rovers, rather some old, loud, single engine planes that were unspectacular but steady, like Land Rovers would be if they had wings. I sat down with my boerwoerst and beer lunch to listen to the live singer/guitarist musician whose repertoire included Van Morrison, Simon and Garfunkel, Sting, and, incredibly, Led Zeppelin. All good music for the white, baby-boomer audience in attendance, But after he was done with the boomer stuff the musician switched to Afrikaaner folk songs and the response was enthusiastic, to to say the least. I was treated to a real Afrikann`s culture moment, complete with beer and braai and songs about independence and overland travel. If there were any blacks there I did not see them, this seems to be exclusively a white South African, Afrikaans cultural phenomenon.
In addition to the cultural experience, I was able to benefit from the collection of overland outfitters and suppliers. In addition to a better knowledge of the market I came away with a floor-mounting safe for our vehicle, as well as a lovely Land Rover cap that I have always wanted but never came across.
I did miss the Guiness Record shot. The convoy apparently had 1007 Land Rovers of various vintages and models, ranging from Series from the 50s and 60s to just-off-the-line Discovery 5s and the new euro-styled Range Rover Evoque. The line stretched for 24 kilometres between first and last Landy. Apparently they are waiting to hear from Guiness if they have the record, but I can’t imagine anyone every getting more than 1,000 Land Rovers in a convoy before. There are some videos on youtube…….
I would have loved to have been able to stick around to overnight and to participate in the Sunday convoy, but my rented Volvo would hardly have fit in, so heading back to Jo`burg to catch the Sunday morning flight to Victoria Falls was easy to do.
This is the first post in the Expedition/Outfitting category of the West African Wander blog, one year after we first purchased the vehicle. That delayed post is terribly misleading, in fact we started thinking about outfitting very early, and even purchased a National Luna 52 litre fridge in late 2010 before we even bought the Land Rover to put it in. Since then the focus has definitely been on restoring the basic vehicle (see post on a Look Back at the Year), but we have made a number of purchases that fall into the outfitting category. This post is going to provide a brief picture of where we want to get to.
The idea for the six-week trip is to spend much of the time camping, interspersed with hotel stays. That means we need to outfit the Defender to sleep, cook, eat , wash and various other sundry activities. Laura and I very much enjoy the outdoors and have done lots (I mean lots!) of camping, including car and canoe camping in Canada and backpacking in Costa Rica. However our overland vehicle experience is limited to the week we rented an outfitted Defender from Bushlore in Johannesburg in 2010 and took it up the Sani pass into Lesotho (see separate post TESTING THE IDEA). We had also rented a small motorhome van with our daughter Katherine to do a trip through the Alberta foothills years ago on the way to our niece’s wedding in Waterton Lakes National Park. Not exactly off road or as immediately relevant to a Defender, but it still provided some exposure to independent vehicle camping.
Essentially our approach is to think in terms of systems, a preliminary list of which could include:
Electrical: We will install a dual battery system where the first battery is devoted to keeping the motor running and a second serves to power camping accessories when the motor is not running, such as a fridge, lights, sound system, computer, etc. Solar power back-up will also be useful.
Cooking/eating: In South Africa we carried two propane tanks with fitting burners. We need to find out what fuel supply is most available in the area we are covering and design a system to fit that. Cooking and eating utensils also fall into this system, as do a table and perhaps a shade/rain awning.
Sleeping: Basically, a tent to protect from the elements. We really liked the roof-top tent we used in South Africa/Lesotho and just need to figure out how to get one into Ghana.
Water: We need water for washing and potable water for drinking and cooking. Options for either include storage tanks installed in the wheel wells or the back seat interior floor or jerry cans mounted on the side or the roof. Safe weight distribution, specifically the need not to put too much weight on the roof, is one of the considerations that favours the storage tank system. Water sources will be limited and for drinking water we may need to rely on buying commercial bottles and just store those. Some way of purifying water, and cleaning fruit and vegetables, will also be necessary.
Lighting: This close to the equator it gets dark at 18:00 every night so having sufficient exterior light to be able to use and enjoy evenings is very important. I would also like to have additional driving lights as a backup in case of system failure or in the event of sandstorms. And extra driving lights on a 4×4 look so cool…..
Recovery: This is the term the 4×4 off-roaders use to refer to getting unstuck. It is probably not worth investing in a winch because we are not planning or expecting to do much off-roading, but a tow-rope, whether for our benefit or for others, is probably a good idea, as would be jumper cables. This category could also include a tire pump and sand ladders of some sort.
Maintenance: This is about the tools that are required to address the most likely problems that might arise.
Storage: All the systems mentioned above imply some need for storage, indeed water and fuel systems are essentially storage systems. However, we need to think about accessible storage for all the kitchen gear, food, clothes, tools and accessories. The refrigerator is an important component of storage.
In addition to these these “systems”, there will no doubt be other things that will come up as we learn more about “overlanding”. From now on most posts will be in the outfitting category.
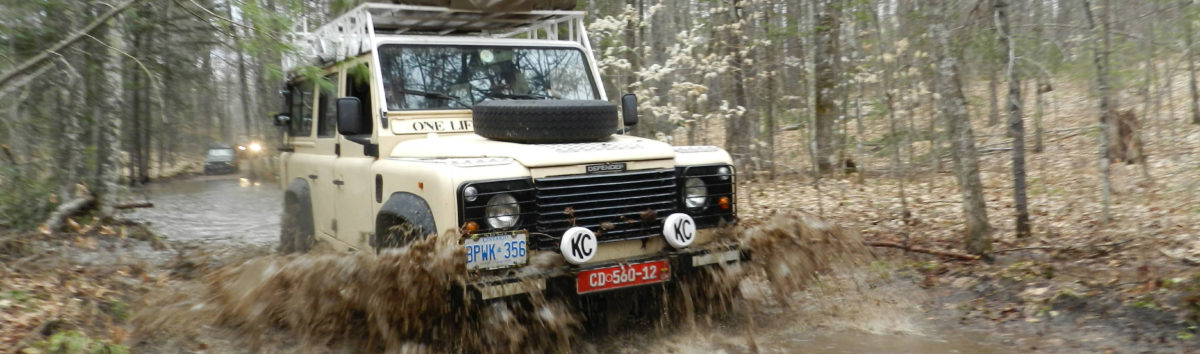
I have never had a vehicle completely painted before and the fact this is a 15-year old fixer-upper truck places my experience at further distance. As we get close to the actual painting I am increasingly focussed on details, wantng to make sure I have done everything that should be done first first, and amazed at the number of things that I did not think of that still need to be done. It was in that spirit that I took the Defender up to Paani the welder after he thought he had seen it for the last time, to adjust the bonnet to accommodate the chequerplate aluminum fender tops that will go on after the painting. I realized that having to adjust the bonnet and fenders to fit the aluminum plates after the painting could result in some nasty scratches. Has to be done first. I also asked Panni to remove the two spare tire carriers, one that was welded to the bonnet frame and another that is attached to the rear door, all because I am trying to take as much off as possible before it is painted in order to reduce that great Ghanaian painters short-cut, the tape around.
The spare tire holder on the rear door poses a bit of a dilemma. I am not sure I want to keep a tire there at all, since Paani impressed upon me how carrying a tire on the rear door on rough roads can damage the the door frame. I don’t like the way the rear door behaves with a big 750/16 tire and wheel on it anyway. I thought it might be better to carry the spare tire on the bonnet, which the high Land Rover front seat and window makes possible without affecting visibility.
Removing the rear door spare tire carrier
The rear door spare tire carrier consists of a foot square steel plate on the outside of the door, attached to the door itself via 11 bolts into another plate on the inside of the frame with three large three large bolt-like extenders welded to it that go through the holes in the body and the outer plate to secure the wheel through the bolt holes. From the perspective of getting ready to paint, the steel plate on the outside would be difficult to tape around and I would never be able to get the sprayer to remove it. He would want to take the tape-around short-cut so popular among house and vehicle painters alike here. Then everything appears as if it were “painted around” – not an image I want to convey in this rebuild. But for the rear-door wheel carrier Paani said that it would be too difficult to remove, and upon first inspection it did indeed appear as if the whole thing might be welded to the frame inside the door, perhaps as a result of the door frame repair that Paani did. However I could not resist trying to loosen the 11 bolts and to my delight they all came undone quite easily and the interior plate to which the wheel holders are welded to slipped out nicely and the whole unit came out. With that the exterior body is pretty much stripped, save the rear wheel arches that rim the wheel wells.
With that I have moved to the interior, which was already pretty stripped by Paani during the earlier body work which included the door work and filling of some random bolt holes here and there. The roof liner, the door panels , and the rear cargo bay bench seats are all gone. But when you look at it through a spray painters eyes you realize how much is still left to take out. Seat belts for example. Seat belts are secured by bolts through the frame in two places. I spent a couple of hours after work this week to try to get them out, but was only partially successful, frustrated by limited tool choices. Nuts that have been on bolts on the bottom exterior for fifteen years are not easily removed despite any amount of WD40. I was able to get one end of the belts free on both sides, but I could only loosen the two that are directly bolted into the chassis frame enough so the seat belt rollers come away from the interior body enough to expose the surface underneath for painting and can be wrapped to keep the paint off them. Better than taping, but not much. The good news story is the the “cubby” box between the front seats. This was surprisingly easy to get out, four bolts that thread through 2×2, the only wood in the whole vehicle, into threaded holes right in the frame.
I was also able to remove the front passenger seat quite easily (need to leave the drivers seat in to be able to drive to the sprayer!) – my nemesis was the back seats. There are no fewer than 12 bolts that secure the simple bench seats through the floor into the frame. The nuts underneath have not been touched for 15 years and are EXTREMELY stiff and rusted. I was able to loosen and remove a couple, but stripped two of the nuts quite badly and decided to stop and review alternatives. Francis just happened to come by to drop off the refinished front grill as I was struggling with these in our yard and he came to my rescue with an invite to his shop where he has access to an arc welder that can cut them off.
Today I left work early to beat traffic and drove out to the Kaneshie district where Francis has his shop. He had one of his boys take me over to another place, down a side street, off onto a dirt track that wound through some houses into an industrial yard that led to a fair-sized machine shop that was retooling various pieces of machinery and gears from transmissions and the like. The yard smelled seriously of waste, there must have been an open sewer, a not-uncommon phenomenon in Accra, behind the adjacent wall.
I was welcomed by a couple of fellows to whom the boy did the explaining in Twi, upon which they pulled out their tools and went to work. They were able to get three of the twelve bolts out intact. The other nine were removed with a hacksaw or smashed with a large three foot chisel and a sledge hammer, not tools I have in my kit, but against which a ½“ bolt is no match. The electric welder on standby was never called upon, brute force prevailed. The back seats are now out, and I am (only) 30 cedis (20 dollars) poorer for the labour and the tools. Francis has someone getting nuts and bolts to replace the ones that were lost to the process.
Finally got the back seats out, the cargo bay bench seats have been out for months. The ride like this is anything but quiet.Cubby box and passenger seat gone, the last lonely ride for the old driver's seat
However, that was not the last thing to take out. There are also plastic covers over the back seat catches, and the foam and fabric liner around the front seat boxes, which is glued down and leaves annoying strips of foam behind on the metal that has to be scraped off. Then there is the a piece of interior liner above the rear door that had escaped Paani’s removal campaign, and the seat belts in the front. There don’t seem to have ever been any seat belts in the back seat.
I don’t think there is any good reason to delay painting any more. I know as soon as it is painted it will start to get nicks and scratches and that creates some degree of inertia, but I can get touch-up paint and the work here is very good and not expensive. Once the paint is on we can proceed to finish the interior off with the new cushions and seat covers that are sitting in our storeroom, put the soundproofing and carpet in and put back all the interior fittings. None of that will take very long, soon we will be able to focus on the expedition prep. But painting is next.
In the process of perusing the seemingly endless Land Rover restoration sites we could see that (so-called) “soundproofing” was a common step in most projects. The term is a bit optimistic, one can never eliminate sound in a vehicle, so “sound reduction” is a more appropriate term.
All vehicles have some degree of soundproofing, it is the stuff under the carpet on your floor and the trunk/boot. The thick piece of silver lined foam under the hood/bonnet is also soundproofing. Depending on the vehicle and/or the preferences of the owner there can be any number of products and combinations thereof used throughout, including in the doors and roof. People who are restoring older vehicles, whether they are 50s roadsters, 60s muscle cars, or 90s Defenders, will at some point likely decide to reduce noise by installing additional soundproofing materials. Land Rovers are no exception as the various threads in Land Rover Forums show.
Defenders and other Land Rovers of their era were built as big utility vehicles and because of this and the large areas of the aluminum body they are probably among the noisier vehicles on the road. Ours is absolutely utilitarian, and has only bare metal on the floors and walls. The doors do have small patches of sound dampening materials on the inside of the door panels, this would have been part of the factory production process. The roof has quite a good piece of hard plastic liner behind the interior roof fabric, but that is not going to do much against the vast areas of bare aluminum.
We decided it was worth looking at sound reduction, but had no idea of where to start. I started scanning for what materials worked best and learned a lot about the science of sound reduction. Obviously there is a huge sound reduction industry, but I was surprised to learn how much of it is devoted to vehicles. I learn that there are two separate steps involved in sound reduction: the first is referred to as “dampening” or “deadening”. This addresses noise generated or amplified by the body panels themselves and involves the installation of some sort of very heavy rubber/butyl material, lead is sometimes used to add weight. The dampener is added to directly to the metal surface and transforms the sound waves into heat. Thus an integral part of a good sound dampener is a layer of metal foil that helps keep the heat from entering the vehicle.
The second key function is sound absorption, a barrier to collect the sound waves that are generated both inside and outside the vehicle. This is what is done by the baffles one sees on the ceilings of in orchestral halls. Baffles are not terribly practical in your car, so this function is usually performed by a light, open cell foam. This is applied on top of the dampener. And that is about it. That is most certainly an overly simplistic description of the basics of vehicle soundproofing, but it helps to set the stage for the story of our product scanning and eventual selection of a product. There is a great variety of products available, some which perform one or other of the functions, or perhaps combine them both. All the sellers say more than one layer is better, which no doubt helps to sell sound proofing material.
The first supplier that we became aware of is the aptly named Noisekiller(NK) of Great Britain. www.noisekiller.co.uk/vehicle_soundproofing_products.asp. NK makes sound reduction materials for every imaginable application, including but certainly not limited to vehicles. I became aware of them because they happen to produce custom “soundproofing” kits for Land Rovers. The product is highly recommended by many others. Thinking this might be the way to go last May I exchanged emails with Andy, my contact at Famous Four, who said he could get NK to send them a kit which they could send on to me as part of my star-crossed third shipment (see separate “Customs Shock” post).
However, at this point I encountered the problem that would make getting sound proofing to Ghana a real challenge: the weight. The stuff is expensive enough to begin with, but it weights as much as 1 pound per square foot, which rather renders international shipping costs prohibitive. The NK Defender kit costs 280 British Pounds, or about $450, to buy, but the weight of that kit is 50 kilos! Andy said he could get a 5% price reduction from NK to cover the cost of getting it to Famous Four, but for them to send it on to Ghana would be an additional (gulp) 430 British Pounds, or almost seven hundred dollars just for shipping, for a total cost of more than $1,200. That is very expensive quiet. I told Andy thanks, but I would have to pass.
That began a long search thither and yon for a less expensive noise reduction option. Some Land Rover forums have people talking about assorted construction materials that are usually readily available in North American or European hardware/building supply companies, for example the ashphalt paper that goes under roof shingling, but that sort of thing is not necessarily available in Ghana, and would be very difficult for me to locate. My local search did lead me to Ghana Rubber Products, which I thought might produce some sort of heavy rubber that would work. They produce sheets of rubber of varying sizes for shoe soles (ie. flip flops) This led to a Saturday morning meeting with the owner at the GRP plant in Accra, who showed me what they had. They identified a 3 mm thick but not very heavy rubber that I thought might at least serve as a sound barrier for 30 cedies ($20 dollars) for a 4×6 sheet. At that price we could do the whole Defender for about $100. I went back a week later and spoke to his brother who, incredibly, happens to own a Land Rover Defender and had actually purchased NoiseKiller. He knew something about sound reduction and recommended Noisekiller, he was not confident the product I had been looking at would do too much, but he identified a slightly lighter material. I bought four sheets worth of his flip flop sole material thinking I could use it as sound absorber for some areas, but left knowing I was still in the market for sound reduction material.
Other options I found included Genesis of South Africa and Second Skin or Dynamat from the US. I spent a lot of time looking at Genesis www.genesisacoustics.co.za, because it seemed to be a good product reasonably priced. They also have a liquid paint on product that one can apply inside or outside the vehicle, which extends the area that one can apply it to. However, when I eventually measured and got a quote on the material and shipping it was only marginally less than the NoiseKiller from Great Britain.
In the course of surfing the web for more ideas and sources I stumbled upon a company called B-Quiet www.b-quiet.com, which sold dampener, absorbers, and combinations thereof and billed themselves as “the affordable sound deadening solution”. One of the things I noticed was their website gave prices in US and CAN dollars and I assumed they were an American company selling into Canada. The $C=US$ exchange rate they gave was rather unfavourable to the Canadian dollar, which would make an American product more expensive to Canadians, so in a patriotic mood I sent them an email to say as much. I received a prompt reply saying they in fact were a Canadian company located in Alberta and they thought their exchange rate was just fine thank you. Of course, if they are producing in Canada and selling to the States the low exchange rate only makes them more competitive with American products like Dynamat. Brilliant.
I looked at this product more carefully and judging from reviews their quality was good and the price gave credence to their website billing as the “affordable sound deadening solution”. I looked at something called B-Quiet Ultimate, a sound dampening material, and V-Comp, a combination sound dampening and absorbing material. They also produce B-Quiet Hiliner, a thicker aluminum lined acoustic foam for under the bonnet. Similar materials are available from Genesis or from Noise Killer, but the Canadian company’s price was much more reasonable. I was able to get a quote of $500 for an coverage area larger than NK or Genesis, delivered to Ottawa.
The Ottawa delivery is where the real beauty of this Canadian- sourced option plays out. I have an annual mailing allowance from Canada of one hundred pounds, which might not go far if you have a large family or get lots of magazines, but this year Laura and I have only used 25 lbs. It is now October and we have more than 75 lbs of shipping we have to use before the end of December. As it turns out the weight of two 50 sq. ft rolls of B-Quiet Ultimate and two 15 sq. ft. rolls of V-Comp is about seventy pounds – the Hiliner only weighs another pound. I could use more V-Comp but if we go over our weight it will just be held in Ottawa till next year. I can order more then if I really need it. I am planning to combine the B-Quiet Ultimate deadener with the V-Comp in the particularly vulnerable areas in the front of the cabin until the V-Comp runs out and and then use pieces of the Ultimate in combination with the flip-flop sole material from Ghana Rubber Products for less vulnerable areas.
B-Quiet products purchased: 30 sq. ft. of V-Comp barrier (1 of 2 rolls on the floor – 18 lbs); 100 sq. ft. Ultimate, (1 of two rolls on the table – 17lbs); and a 4×6 sheet of Hiliner for under the bonnet (silver on the right – 1 lb
It only took about two weeks to get here, and with this in hand I am ahead of the game because we can’t install it until after the painting is done, which won’t be for a couple of weeks yet. With this material installed and covered by carpeting our Defender will hopefully be elevated from clangy utility vehicle to relatively quiet cruiser.
Why more than one phase of electrical? Because I want to focus first on the basic things every vehicle requires to run and for basic safety and roadworthyness certification. Headlights, horn, signal lights etc. The basic stuff. There are other systems required to support expeditioning, but that can come later – in Phase II.
I drafted up a list of the items to do in Phase I and II and got a couple of quotes on Phase I. The low bidder, by a wide margin, was Eric from Opere’s shop under the tree so I asked him to do the work while we were in Egypt. The work is now done and it is amazing how much you appreciate little things. There was not very much right about the basic electrical when I first bought this vehicle. Most seriously the the alternator did not work, a problem that was corrected when a new-to-me alternator was installed with the motor. The front windshield wipers wiped, the rear did not. Only a couple of the signal lights worked, the brake lights did not, nor did the headlights, nor the horn. Up till now whenever I have pulled up to the high, solid, windowless gate outside our house I have had to rev the engine so the guard knows I am there to let me in rather than honk as one normally does. Fortunately the engine makes lots of noise. The horn now works, as do all the lights. He also did the rear windshield wiper motor and the windscreen washer fluid pump. He charged me GHC 300, or about CAD 200
Eric’s price includes a number of things that cannot be done until the painting is complete. This includes installation of all the new exterior light fixtures that I bought on Opere’s recommendation that the 15 year old ones that don’t look too bad now will look terribly old against a new paint job. Eric has also bought me a large interior cabin light for the rear cargo area and will instal this and the front cabin light that has been stripped out (along with pretty much everything else) in anticipation of the interior painting. My only real regret with respect to the electrical is that I have not yet had time to sit down with Eric and go throught the electrical system so I can learn about the circuits, fuses etc. There are also still a number of old wires hanging about from the earlier A/V system that EPA used to support its public education programs in the field and that I decided would not be of any particular use to us. I was going to do this when we came back from Egypt but about that time poor Eric was passing between two parked cars when one of them backed up and pinned him, causing some ill defined damage to his internal organs and putting him out of action for awhile. He seems OK, but I don’t want to bother him while he is convalescing. It can wait.
That is Phase I. Phase II is the electrical required for expedition outfitting and it will be more complicated. A dual battery system to support a fridge, lights and circuits to support other interior and exterior accessories, together with a solar power back-up system will be the main elements of the Phase II work. The big question is whether Eric, or anyone here, will be able to handle this. Half the Land Rovers in South Africa have a dual battery system but here no one seems to know about it. I may have to teach myself about the fine points of dual battery systems and solar power back-up to get this done. I have already purchased the isolator kit for the dual battery system, actually we have purchased two. One Laura bought at Canadian Tire when she wen to Canada in August, and another I bought from OffRoad Egypt when we were there in October. Neither were terribly costly and I don’t mind having a couple of choices to increase our chances of getting this operational. I will do a separate post on Phase II of the electrical after the painting is done and I can focus more on that.
Getting my 15-year old Land Rover Defender painted is proving to be full of challenges, one of them is identifying a “sprayer”. Identifying and contacting a painter has been more difficult than for any of the other specialists that I have dealt with. Opere has been my first reference for specialists ranging from mechanics, bodywork and electrical , but the painting is in a different order because, obviously, there is no paint oven under Opere’s tree. Over the course of the past few months whenever I have broached the subject of painting with him to try to nail down that phase of the project he never seemed very interested. Strange because there are frequently one or two Defenders in his yard that look like they are just about to go for painting or have just come back from painting. It was only when he realized I had found the Sikkens shop and had gotten a price he focussed. As he always does, he stressed the importance of ensuring I was going somewhere that would do a good job, but did not promote anyone he knew. When I told him who I was talking to and how much they had quoted he seemed to relax, either because he was satisfied that this was a good place, or that he could not beat the price and still take a cut that would make it worth his effort.
My former colleague Stephan had recommended Sikkens, a name which is well-known for paint around the world, as a place that had done a very good job for him at a reasonable price. He said he had his Defender painted “at Sikkens”, so assumed was a business somewhere in Accra. I saw his Defender and it looked great. Since then everyone, including Opere, has recommended that I use Sikkens Autobase paint, but is clear they are not recommending any one place. Rather they each seemed to have their own favourite “sprayer”, all of whom may use Sikkens paint. I was left wondering if “Sikkens” was a place in Accra as Stephane has led me to believe, or just a brand of paint.
To enlighten myself I turned to Google and searched “Sikkens in Ghana” – there were about a dozen auto paint shops that come up. I noticed that one of these, “Kolours”, was located not too far away from where I live so I went by to have a look and talk to them. The first thing I noticed when I pulled up was that the name “Kolours” did not appear anywhere on the front of the seemingly small storefront operation, rather it featured “SIKKENS”, as if that was the name of the shop. I sent an email to Stephane with description of the location and he confirmed that this was in fact where he had had his vehicle painted. So there is no one “Sikkens” it is rather a network of places that happen to distribute Sikkens paint, and which probably have to undergo certain training and maintain certain quality standards in exchange for the name.
The manager of “Kolours” is Bernard, a personable Ghanaian who each time I go back to look at colours, or ask questions, he says, “I’m ready”, his subtle way of reminding me that it has been well over a month since I first spoke to him and said I was going to bring it in for the paint. The problem is I keep finding reasons to delay, I am not really ready to paint yet.
I have had three informal quotes on painting, Opere and Francis have cited numbers, but without the benefit of any close look at the details of what it is I want to do (Iie. everything has to come off before painting, two colours outside, one inside and bottom paint). I have only given those details to Bernard, and his price is the same or only marginally higher than the quick quotes I got from Francis and Opere. What also swings it in Bernard’s favour is that I know one satisfied customer, and the Kolours shop looks very clean and well run. I will use them, but follow Stephane’s advice to monitor the work closely myself. But we are not ready to paint yet, there is still an undercarriage to clean up, and a few niggly pre-paint details.
Defenders are basically trucks and usually coloured appropriately truckish. Maybe it is the military origins honed by years of utilitarian uses. That is reflected in the LRs one sees around Accra. Dark Grey, Dark Blue. Dark Green.
However, in Ghana lately the most popular colour for the rebuilds coming out of Opere’s shop seems to be white. That may well have been inspired by my colleague Stephane who had his Defender done that colour last year and it generated a great deal of positive comment. It makes for a very pretty truck. However, we are looking for something a bit less pretty, more truckish. Somehow the idea of touring the Sahel region of Africa in a bright white truck that stands out from everything else does not quite seem appropriate.
A great many of Opere’s rebuilds end up white
After looking at lots of choices, reviewing colours on-line and going by paint shops to see what they offer we shifted our preference a few times. We hovered on white for a fair bit, shifted to burgundy for a short bit, and then finally settled on what the Land Rover official colour scheme calls NATO Lightstone. Right in the military tradition. In more common terms one might call it Tan, or Caramel. Some chips we have seen call this Sand, but that is misleading. The vehicle already seems pretty sand-coloured. We have chosen, or at least we hope we have chosen, something darker and more vivid. This choice was inspired because we saw one drive by (without our camera in hand). With a white roof and white wheels it will look very sharp, but not so sharp it will look terribly out of place in Ougaudougou or Timbuctu. We have no photos yet, but here is a neat site that we used to test colours. Try the Desert Sands in the bottom left-hand corner of the chart, on the 90/110. https://paintman.co.uk/shop/nato-light-stone-satin/ That is the only way you get to see the colour now because we do not have any examples
Every tow truck one sees in Ghana is an old Series Land Rover
Picking a colour is the easy part. In Ghana even getting a vehicle painted comes equiped with its own socio-cultural nuances. I have a “welder” who does the body work and who is responsible for getting the vehicle ready, but only up to a point. The “sprayer” does more than just paint, but it is really tricky to figure out where the welder’s responsibility ends and the “sprayer’s” responsibility begins. During the bodywork the welder (Paani – see separate post) went through the vehicle and straightened crooked pieces, replaced rusted parts, punched out and filled dents and sealed any unwanted screw holes. But when he finished he left the fill sections a bit rough on purpose. That, I learn has to be done by the sprayer just before the paint goes on, so it is clean and there is no water that has penetrated the filler. That makes sense once you learn it, but you have to learn it. There is a lot to learn, I have never had a vehicle fully painted before and that fact that it is a fixer-upper truck that I want to convert to something comfortable and attractive means I cannot count on everyone else to bring the attention to detail, I have to do that myself.


")


